FastAPI Installation

Create a Virtual Environment
The following instruction can change depending on what OS and terminal are used, in my case, I'm working with Windows 10 and CMD.
Open a terminal in the root project's directory and execute:
path-to-the-project>python -m venv envIn the last entry, 'env' is the directory that will be created to host the Virtual Environment
Now we need to activate it, we move to 'env/Scripts/' directory using the terminal:
path-to-the-project>cd env/ScriptsFinally, introduce the command 'activate' and the word '(env)' will appear at the beginning of the terminal line:
path-to-the-project\env\Scripts>activate

(env) path-to-the-project\env\Scripts>
At this point, our Virtual environment is created and active.
To deactivate it, use the command 'deactivate' and the word '(env)' at the beginning of the command line will disappear:
(env) path-to-the-project\env\Scripts>deactivate
path-to-the-project\env\Scripts>
Finally, it is important to go back to the root project's directory:
(env) path-to-the-project\env\Scripts>cd..\..
(env) path-to-the-project>
Install FastAPI
Having active the Virtual Environment, install FastAPI using 'pip':
pip install fastapiIt is necessary to install 'uvicorn' because FastAPI does not include a server:
pip install uvicornAnother alternative is installing the complete package 'fastapi[all]', which installs FastAPI + common libraries for working with FastAPI:
pip install fastapi[all]First API
In the root directory, create a file 'main.py' with the following content:
from fastapi import FastAPI

app = FastAPI(title='The title',
              description='The description',
              version=1)

@app.get('/')
async def index():  # For asynchronous answer
    return 'Hello world'

@app.get('/about')
def about():  # Conventional answer
    return 'The content of about'
This is it, the first API is done.
The arguments of the Class FastAPI can be omitted, but it's Ok to set some metadata from the first step.
We defined 2 routes: '/' and '/about' and both routes return a string.
Run the server
For watching the API in action, it is necessary to run the server, then try this in the terminal:
uvicorn main:app --reloadIn this case 'main' refers to the file name, 'app' to the FastAPI object and '--reload' to the server will automatically restart to load the changes.
You can also change the default IP and port with --host ip and --port int.
The response in the terminal should be:
INFO:     Uvicorn running on http://127.0.0.1:8000 (Press CTRL+C to quit)
INFO:     Started reloader process [13288] using StatReload
INFO:     Started server process [10944]
INFO:     Waiting for application startup.
INFO:     Application startup complete.
This response indicates the server is active at localhost:8000, and for stopping the server must type CTRL+C
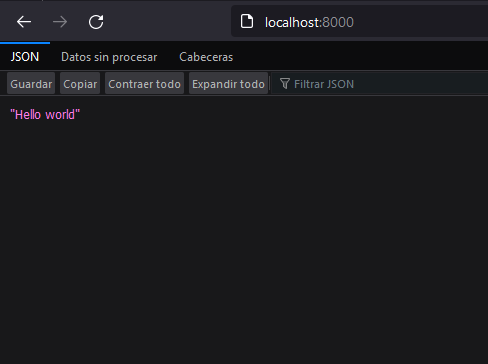
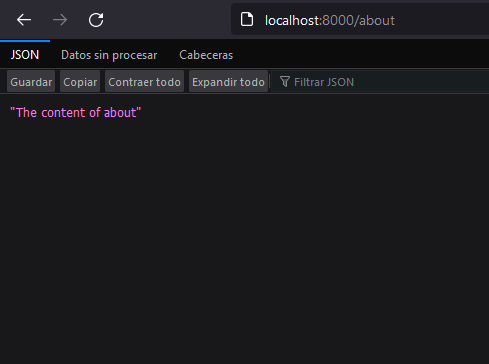
Now, open the browser, type 'localhost:8000 and we receive a fantastic 'Hello World', later we can type 'localhost:8000/about' and we receive 'The content of about'.
Thanks for reading :)
I invite you to continue reading other entries and visiting us again soon.